As the Garden Grows
Looking at old photos of the garden can really bring home how much has changed in just a few years. I've been doing just that to prepare this post of before and after wide shots of the garden. It's amazing to see plants I barely even remember growing, embarrassing and humbling to see some of the dumbfounding gardening mistakes I made, and simply astounding to see how much has changed in just a few short years. For this post I'm sharing the changes, not the embarrassing mistakes, though a few of those did slip in.
July, 2014. Looking quite full at the height of summer, though nothing particularly special or exciting about it. This was pre-deer fence, when I relied heavily on heaths, heathers, barberries, and other deer resistant plants. This planting is also mostly from what I did in high school, before I knew about all the more fun deer resistant plants or where to find them.

November 2015. I had started removing plants from the island in preparation for redesigning it to its current incarnation. You can see piles of compost in the background. Those were used for the island redo, to create new beds by "connecting the dots" with some isolated trees you'll see later, as well as (I think) raising the sunken soil in the Acer griseum bed.


As the border in the back also extended in length, a wider shot is in order, too. In this photo and the last, you may just be able to make out the golden culms of Phyllostachys viridis 'Robert Young', near the center of the last photo and a bit to the left, highlighted by the sun, in the photo below. Robert Young is a rather slow-spreading, easily-managed running bamboo in the PNW. That's right. Different running bamboo run at different rates. Some barely crawl, acting almost like clumping bamboo, though in the right conditions they could still run (easily controlled with rhizome-pruning once or twice a year). I obtained a start from a friend this summer to create a small grove to help block the view and return afternoon shade to this area. I'm thinking a couple more clumping bamboo in the border, and a couple loquats, are also in order, for screening, shade, and because they'll look good!


The south end of the house in May, 2014:


And today:
Now for the largest part of the garden, the area that would come to include the Hell Garden and The Park.
May, 2014:


Acer griseum (AG) bed in May, 2015. Note the scattered trees to the right.


Now that the garden is "finished", at least insofar as I won't be making any new garden areas (though I do want to redo a few existing ones), and things have had a little time to grow, it's time to show the progression of this garden from mostly lawn to what it is today (and what that is, I'm not exactly sure). As the garden has changed so much in just a few years, I don't always have comparable wide shots, but I've tried to include the ones that best show how the garden has developed.
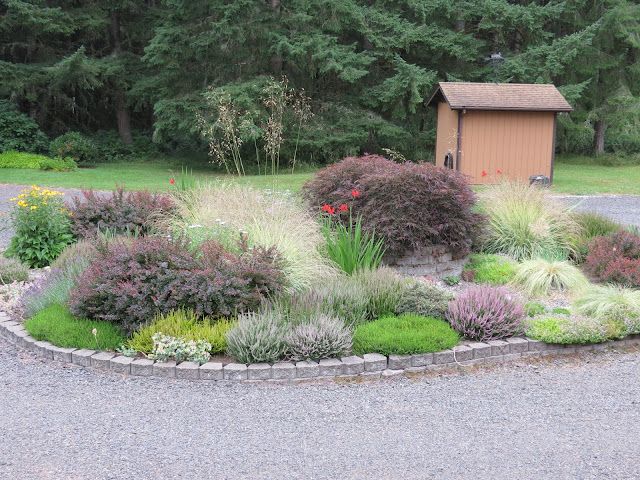
We'll start with a few photos of the Driveway Island. This bed existed in the middle of the circular driveway before we moved in, but went through significant changes. You can see some of those changes in more detail from the earliest days, to the initial redesign, and also catch glimpses of the surrounding areas in the background. I should probably finish that series on the DI one of these days... The following photos also offer glimpses of the surrounding areas, so be sure to click on the individual photos to view them at full size.
We'll start with a few photos of the Driveway Island. This bed existed in the middle of the circular driveway before we moved in, but went through significant changes. You can see some of those changes in more detail from the earliest days, to the initial redesign, and also catch glimpses of the surrounding areas in the background. I should probably finish that series on the DI one of these days... The following photos also offer glimpses of the surrounding areas, so be sure to click on the individual photos to view them at full size.
July, 2014. Looking quite full at the height of summer, though nothing particularly special or exciting about it. This was pre-deer fence, when I relied heavily on heaths, heathers, barberries, and other deer resistant plants. This planting is also mostly from what I did in high school, before I knew about all the more fun deer resistant plants or where to find them.

April 2015, included mostly for the Rhododendron border in the background, and also to further illustrate how dense the trees on the neighboring property used to be.

November 2015. I had started removing plants from the island in preparation for redesigning it to its current incarnation. You can see piles of compost in the background. Those were used for the island redo, to create new beds by "connecting the dots" with some isolated trees you'll see later, as well as (I think) raising the sunken soil in the Acer griseum bed.

The Driveway Island today. I know, I skipped 2016, but that was the summer the neighbors clear cut, so I avoided photographing the view for quite a while and the new plants were mostly just filling in, anyway. The clear-cutting to the west really changed things, exposing the garden to more drying winds in the summer, but it also gave us some really beautiful evening light. Not that you can see that in the photo below, because I took it in the morning.

Now we'll jump over to the rhododendron border in the background of the last photo. This was it in May, 2014:

It didn't really change much, except that the rhododendrons grew larger. Here it is again in July, 2016. As you can see, this is post-logging and there are the remains of a couple compost piles from the 2015 work.

And today. The alder just on the other side of the fence lost a top last winter, which fell right on top of the biggest rhododendron, and a few other plants besides. You might be able to make out the regrowing rhodie just to the right of center, the spindly one in the big hole in the border. The view is much changed, and not for the better, with slag piles (logging left-overs) and neigbhors visible. But there's also more garden to look at!

As the border in the back also extended in length, a wider shot is in order, too. In this photo and the last, you may just be able to make out the golden culms of Phyllostachys viridis 'Robert Young', near the center of the last photo and a bit to the left, highlighted by the sun, in the photo below. Robert Young is a rather slow-spreading, easily-managed running bamboo in the PNW. That's right. Different running bamboo run at different rates. Some barely crawl, acting almost like clumping bamboo, though in the right conditions they could still run (easily controlled with rhizome-pruning once or twice a year). I obtained a start from a friend this summer to create a small grove to help block the view and return afternoon shade to this area. I'm thinking a couple more clumping bamboo in the border, and a couple loquats, are also in order, for screening, shade, and because they'll look good!

Moving on to the larger shade garden on the other side of the driveway, here it is in May, 2014, looking toward the house from the driveway. Totally unbroken lawn, only a few daylilies on the far side of the creek bed and a scattering of plants moved from the front of the house to the south end.
 |
| The dry creek had just been put in a year or two before, and the railing on the front entry was still being installed. Out of frame to the right, only a few isolated plants were growing in the dry shade border-to-be. |
Just two months later, in July 2014, trees went into this area, and the dry shade border was created, though it wasn't a dry shade border at that time as we were intent on growing rhododendrons there and didn't understand how truly dry and poor the soil there is. It's a different view from the previous photo, as I'm standing to the north of the star magnolia instead of just south of it. You can see the edge of the dry creek bed on the left side of the photo for reference. I do not miss the days of individually-caged trees.

November, 2015, after I spent the previous month or two connecting the dots in the photo above to make actual beds. I've moved back a bit in this photo compared to the last, to include the compost pile remnant where I had heeled in plants waiting to find their homes. You can see part of that pile in the lower left corner of the previous photo, for reference. I took Carex comans seedlings from the Driveway Island and started planting it after moving most of the plants-in-waiting to other homes.

July, 2016. There's also a new bed on the right compared to the last photo. See that little strip of grass between the bed in the foreground and the driveway? Really, what was I thinking? That must have been pure laziness, just using whatever space the compost pile had cleared and not digging out that little strip.

And the same view, today:
 |
| I can't believe how brown the grass is in all these current photos, even compared to the July photos of previous years. It's been so dry this summer. |

And today:

Looking toward the house in May, 2014:

And today:
 |
| Of course the garden has changed substantially, but this is another photo that really shows how the clear-cutting on the neighboring property changed our late afternoon to evening sun exposure. |
Now for the largest part of the garden, the area that would come to include the Hell Garden and The Park.
May, 2014:
 |
| Look on the far left! That's a rhododendron! Seriously, that spot is way too dry and back then there wasn't even accessible garden water within 100 feet. I didn't put that there. |
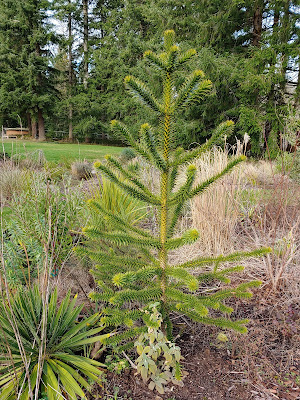
October, 2015. The bed off the patio looks fuller mostly because this photo was taken in October instead of May, so the perennials are fully leafed out, but there have also been a few new additions to that bed. A scattering of new trees are visible, including the Cotinus 'Grace' near the center of the photo, a wee baby monkey puzzle tree up and to the right of the Cotinus, and just behind the Cercis canadensis in yellow fall color is the Heptacodium miconioides. The year 2015 was also the summer that the deer fence went up and we finally extended water lines out into the yard and garden.

A poorly-documented intermediate stage existed after that in which there was a truly unfortunate maze of small island beds. You can get a glimpse in the image below, though the photo is a little blurry and the island beds are partly obscured by wildflower seedlings, making them look rather like recently-seeded lawn.
August, 2016: As you can see in the lower left of this photo, I had begun tilling the future Hell Garden, but this photo shows some of the short-lived island beds out in The Park. Some were combined into larger beds while others were returned to grass and the plants that had occupied them moved to the new, larger beds.

Fall of 2016 saw the biggest changes in the garden, a foolishly large expansion that taught me to take smaller bites in future garden projects. It was worth it, but I won't be taking that much on at one time again, at least not without a full garden crew. Now you can see the final shape of the garden. There are no plans to expand or alter the beds as you see them now, but the plants within those beds will continue to change, be it through growth, death, or replacement as the gardener wills. You can explore the garden in a bit more detail as it was then in this post.

The view today:

Just a few more photos focusing on specific areas.
Acer griseum (AG) bed in May, 2015. Note the scattered trees to the right.

In fall of 2015, the future Big Leaf Bed, was made, which also involved editing some of the trees in the previous photo. This photo is from August, 2016, when I had started tilling the area around the BLB and AG bed to outline their final shape. I did also eventually connect that lone rhododendron on the right edge of the photo to the larger bed. I can't believe I was going to do otherwise.

The BLB existed briefly separated from the AG bed before they were connected in the fall of 2016. And here they are together today, plus a section of the dry creek bed border:

Focusing on the Hell Garden, July, 2016:


October, 2016:

And today:

So many more photos, but it would make this post absurdly long to show them all, and going into greater detail of before and after shots for each area becomes tedious and confusing even for me. This post gives a general overview of the progress made in the garden, and that's good enough for now.

You have utterly transformed this garden, Evan! As I paged through your post I was more and more impressed. Your neighbor's clear-cutting exercise was unfortunate but, in time, I know you'll fully repair that view on your side. Congratulations!
ReplyDeleteThanks, Kris!
DeleteWant a real impact? Don't look at the "before" photos again until your 10-year garden anniversary. You will be shocked at how "wimpy" it looked. I look at the photos of my little beds of perennials from 15 years ago and just have to laugh. :)
ReplyDeleteOh, that will be something, once the trees and shrubs have grown and supplanted the wildflower look. Not to mention all the bamboos I plan to add this year.
DeleteI'm very partial to before/after blogposts, there never fails to be a few gems of inspiration. Even though my garden is much smaller than yours, I tend to reinvent it often--that's what you do with limited space. You can't make a new bed so you dig one up and start over ! The transformation of your garden is just splendid-your hard work has been handsomely rewarded .
ReplyDeleteWell, now that the beds have been laid out, they can be torn up and replanted at will! Though I expect they'll pretty much be allowed to evolve on their own.
DeleteYou should have posted a few photos of yourself ( and mom and dad) toiling away at that huge green lawn . Now that I've been to see the results ! Beautiful !
ReplyDeleteHa! Mother did no toiling, though my dad did help a little. As for me, I was too busy to take photos of anyone working.
DeleteSo inspiring to watch what a plant lover does with nearly a "blank slate."
DeleteThanks, Denise!
DeleteBefore and after pictures are my favorites too, they are so satisfying, especially if we sometimes get bogged in the small daily details and forget the big picture. I bet your folks are just tickled to have this amazing garden taking shape right in front of their eyes. And yes, we all had those "what was I thinking" moments, which are really just learning curves. Aren't gardeners just tinkerers with living canvas?
ReplyDeleteI'm never sure if they're tickled or apprehensive, but the garden is here now, either way.
DeleteCan I adopt you?
ReplyDeleteCareful what you wish for. ;)
DeleteBusy busy weekend and I'm just now seeing this post, after finishing up mine on your garden which will go live tomorrow morning. I'll have to add a link to this as it is an wonderful accompaniment that really shows what you've accomplished. The neighbor's logging and how it changed your view is so much more clear to me now that I've stood there and looked out over the space with my own eyes. I can only imagine the pain you must have felt.
ReplyDeleteIt was quite painful as the trees were falling. I've mostly adjusted and am enjoying the added evening light while I work to return shade to areas that need it. Looking forward to seeing what caught your eye!
DeleteWow! This is a post I need to read a few times to assimilate it all. What a transformation!
ReplyDeleteI'm looking forward to watching it transform with less input from me, now.
DeleteYou've done amazing work. Long may it grow and thrive and continue to evolve.
ReplyDeleteFingers crossed on that "Long may it grow and thrive" part.
DeleteIt's really nice to see these wide shots of your garden and to notice the amazing transformation. Sorry for not commenting earlier but I kept coming back to look at the pictures and be in awe of all that work. 'Robert Young' is a gorgeous bamboo and will look stunning where you've placed it. The rain has arrived again big time and the golden lawns will once again be green. (Could do without the cold temps though.)
ReplyDeleteNo need to apologize. It takes a while to absorb everything in this post. I love my 'Robert Young' and am so looking forward to new shoots next year. Unfortunately, it's made me want more running bamboo and I had a hard enough time getting permission to plant this one. I've been reading a lot about containment methods and rhizome pruning really doesn't seem like a huge imposition. I enjoy these temperatures, but I'm not looking forward to freezing temps in winter.
Delete