Indoor Gardening: DIY Humidity/Drip Trays
The Pacific Northwest has had an abnormally sunny and dry autumn, allowing gardeners to be more active in their outdoor gardens, but this is normally a dark, rainy time in the PNW. It's a time when the indoor garden can save your sanity by bringing foliage and flowers in where you can enjoy them, warm and dry. Modern homes can get pretty dry, though, so boosting humidity around your plants can improve their health. One way to do this is by setting your plants on humidity trays.
I have a set of metal shelves that I added lights to this summer to grow smaller plants on. At first, I had individual drip saucers under each pot, but this was a very inefficient use of space. I had planned on buying or making large humidity/drip trays to set on the shelves so I could set the plants all on one tray and pack them in a little closer together. Ready-made trays can be expensive, unless you get the cheap, shallow, flimsy ones. These can work well as drip trays, but don't provide a deep enough reservoir for humidity trays. I also wanted the option of using these trays as part of a wick watering system, where you insert a wick into the root ball and run it out the drainage hole to soak up water from a reservoir. Again, I needed a deeper reservoir for this.
Reaching out to my local garden blogging community, my friend Linda at Whatsitgarden pointed me to boot trays from Bed Bath & Beyond. I had checked other local stores and chains and come up empty. These were just the right size for my shelves and were deep enough for humidity trays and wick watering. They measure 28" by 14.5", just shy of the dimensions of my shelves. Curiously, they're listed at $5.99 on Bed Bath & Beyond's website, but were $7.99 in my local store, before tax. Still, much cheaper than pre-made humidity trays of similar material. These boot trays were just the right size for my needs, but you may have to hunt a bit for trays that fit your growing area, be it a windowsill, shelves, or other. Boot trays are a good place to start, though.

This tray could be used as is for large drip trays. The built-in grid on the bottom raises the pots up a little, allowing some drainage. I wanted something deeper, so I had to add my own insert. Louvered ceiling light panels are the perfect material to create your own grid platform to keep the bottoms of pots above the water. They come in large sheets that you can cut into whatever size you need to fit into your trays. As you can see, I cut out one large platform to put plants on. The sides of the boot tray slope inward slightly, so the base is smaller than the top. I cut my platform to fit in the top, and cut smaller sections of the grid to support it. You could also cut one platform to fit in the bottom if you don't need the extra depth.

Setting the support pieces in. I went two high, to bring the main platform almost flush with the top of the tray, maximizing reservoir depth. I found the platform sagged a bit in the middle with just corner supports raising it up, so added longer pieces in the center for additional support. The panels are made of a fairly brittle plastic. I found that bypass blades, like most pruners and scissors, broke the plastic rather than cut it. Use something that cuts with an anvil action, like anvil pruners or large wirecutters, so you can cut exactly as you want. I also used a file to fine-tune the fit.

All assembled. I left the pieces loose, so they could be easily removed for cleaning. Mold, algae, and minerals can all build up in trays like this, depending on your water.
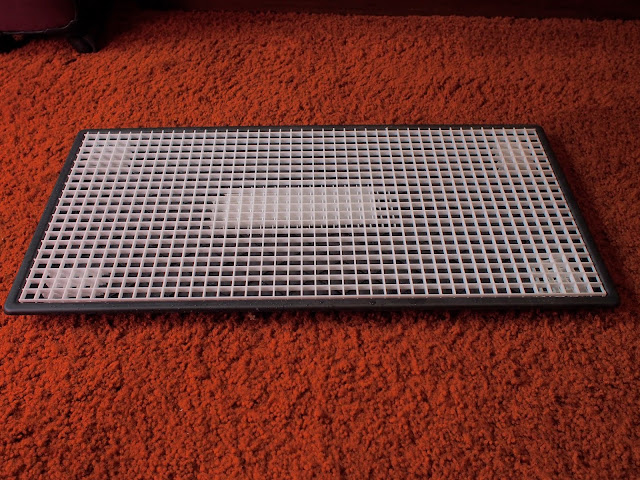
Set into the shelves, you can see the trays just fit, with a little gap.

Now, I can pack plants on as close as their foliage and pots will let me. I ended up putting almost a dozen more plants on these shelves thanks to these new trays, and I still had room for more!

I still have yet to add wicks to any of the plants on these shelves. Wick watering is especially convenient for plants like African violets and other gesneriads, which typically don't like to dry out but also hate being soaking wet. Wick watering works to draw water up into the root ball without saturating the soil. It also keeps the gardener from getting water on the leaves or in the crowns, which can cause unsightly spotting if the water is too cold.
So there you have it. Two large drip/humidity/wick-watering trays for about $33 total, after tax. Trays of similar size and material can cost anywhere from $20 to $75, so I ended up saving a little money, and it only took about 15 minutes to cut the panels to size. And they look pretty good, even if I do say so myself.
 |
| About one month after building the trays, the plants are doing well and I don't have to worry about emptying excess water from individual drip trays. |
I have a set of metal shelves that I added lights to this summer to grow smaller plants on. At first, I had individual drip saucers under each pot, but this was a very inefficient use of space. I had planned on buying or making large humidity/drip trays to set on the shelves so I could set the plants all on one tray and pack them in a little closer together. Ready-made trays can be expensive, unless you get the cheap, shallow, flimsy ones. These can work well as drip trays, but don't provide a deep enough reservoir for humidity trays. I also wanted the option of using these trays as part of a wick watering system, where you insert a wick into the root ball and run it out the drainage hole to soak up water from a reservoir. Again, I needed a deeper reservoir for this.
Reaching out to my local garden blogging community, my friend Linda at Whatsitgarden pointed me to boot trays from Bed Bath & Beyond. I had checked other local stores and chains and come up empty. These were just the right size for my shelves and were deep enough for humidity trays and wick watering. They measure 28" by 14.5", just shy of the dimensions of my shelves. Curiously, they're listed at $5.99 on Bed Bath & Beyond's website, but were $7.99 in my local store, before tax. Still, much cheaper than pre-made humidity trays of similar material. These boot trays were just the right size for my needs, but you may have to hunt a bit for trays that fit your growing area, be it a windowsill, shelves, or other. Boot trays are a good place to start, though.

This tray could be used as is for large drip trays. The built-in grid on the bottom raises the pots up a little, allowing some drainage. I wanted something deeper, so I had to add my own insert. Louvered ceiling light panels are the perfect material to create your own grid platform to keep the bottoms of pots above the water. They come in large sheets that you can cut into whatever size you need to fit into your trays. As you can see, I cut out one large platform to put plants on. The sides of the boot tray slope inward slightly, so the base is smaller than the top. I cut my platform to fit in the top, and cut smaller sections of the grid to support it. You could also cut one platform to fit in the bottom if you don't need the extra depth.

Setting the support pieces in. I went two high, to bring the main platform almost flush with the top of the tray, maximizing reservoir depth. I found the platform sagged a bit in the middle with just corner supports raising it up, so added longer pieces in the center for additional support. The panels are made of a fairly brittle plastic. I found that bypass blades, like most pruners and scissors, broke the plastic rather than cut it. Use something that cuts with an anvil action, like anvil pruners or large wirecutters, so you can cut exactly as you want. I also used a file to fine-tune the fit.

All assembled. I left the pieces loose, so they could be easily removed for cleaning. Mold, algae, and minerals can all build up in trays like this, depending on your water.

Set into the shelves, you can see the trays just fit, with a little gap.

Now, I can pack plants on as close as their foliage and pots will let me. I ended up putting almost a dozen more plants on these shelves thanks to these new trays, and I still had room for more!

I still have yet to add wicks to any of the plants on these shelves. Wick watering is especially convenient for plants like African violets and other gesneriads, which typically don't like to dry out but also hate being soaking wet. Wick watering works to draw water up into the root ball without saturating the soil. It also keeps the gardener from getting water on the leaves or in the crowns, which can cause unsightly spotting if the water is too cold.
So there you have it. Two large drip/humidity/wick-watering trays for about $33 total, after tax. Trays of similar size and material can cost anywhere from $20 to $75, so I ended up saving a little money, and it only took about 15 minutes to cut the panels to size. And they look pretty good, even if I do say so myself.

How timely! While creating an indoor garden isn't my concern, following our latest bout with drying Santa Ana winds, I've been giving thought to how to raise the humidity level around the plants in my lath house. This gives me another approach to ponder.
ReplyDeleteI'm not sure humidity trays would do much in an outdoor setting with wind blowing through the lath house. They're effective in raising local humidity in a house with relatively still air. Maybe you could try misters or something like an evaporative cooler? I haven't been reading much lately. Did you close off the wind-ward side of the lath house to block the wind?
DeleteWell, this is just impressive ! I would copy this in a heartbeat if I were in a climate zone that required more protection.
ReplyDeleteHa! I'd say I'd rather live in a climate where I don't have to worry about protecting plants from cold, but I do enjoy some seasonality.
DeleteNicely done! Thanks for sharing this great alternative to buying expensive humidity trays.
ReplyDeleteThanks! Hopefully people find this useful.
DeleteI've been tweaking my lighting setup ! I might I need more trays and LED lights , seems to be more plants this year...surprise , surprise.
ReplyDeleteI've been pondering space for more lights, too... I want to expand my Streptocarpus collection...
Delete