Work in Progress
It's been some time since I posted any progress on the new garden areas I've been working on. That's because until last week there wasn't much to share. Things kind of sat through the end of the summer heat, and all I really did was dig out the dandelions and other perennial weeds that started coming back post-tilling, and think. I did a lot of thinking, which lead to a couple more areas being expanded to connect small beds into larger ones and simplify mowing and general flow. With cooler weather, and the rains beginning to make a return, it's finally time to start working on those fall projects in earnest. I've made enough progress I feel an update needs to be written, though this is definitely an "in progress" report. Nothing very pretty or exciting to show my fellow plant geeks yet, just a lot of ideas and ground work being done.
Whoops. Blogger seems to have misplaced a couple of my photos. Unfortunately, it seems I have, too. Just imagine a big pile of bark chips, and then a wheelbarrow full of bark chips. Big loss, I know.
We had to order mulch and bark chips for the paths before the rains really returned and made the ground too soft for the delivery trucks to come in or for me to use either the riding lawnmower or wheelbarrow without making a muddy mess of the lawn. We went on a Sunday to order everything. The two people there looked a little dumbfounded when we told them we wanted 45 cubic yards of their "organic plus" mix, a blend of composted bark, coarse sand, and a bit of gravel. Apparently, the dispatchers don't work on Sundays and the people who were there helping us weren't sure how many trucks would be needed to deliver such a large quantity. So we left having ordered only the 10 yards of walk-on bark for the paths, and saved the mulch for later. Laying the paths first wasn't how I'd planned to do it, but that's how it went.
I finished the paths in three days. Thank goodness the bark chips were light, as the riding lawnmower wouldn't start and I had to move it all using the wheelbarrow. I had a few days to rest before the mulch arrived yesterday. Then it was back to work. I did end up reducing my estimate a bit, to 40 cubic yards instead of 45. I overestimated at every step, so I think I'll still have enough for everything and this allowed the mulch to be delivered in only two loads instead of three.
It was after the mulch was delivered that I realized I hadn't done an update for these projects, except for a few status updates on Facebook. So here is a brief tour of the new additions.
This rhododendron border near the western edge of the property was one of the first we planted when we moved to this house. It's main purpose was to help screen off the view of the neighbor's junkyard. Now that he's clear-cut his property, that screen is even more important. The original border ends near the left side of this photo. The rhododendrons to the right of the path are all ones we've moved here this summer to put them in a better, though still too dry, location, and to extend the screen. The original border will extend to connect all of these plants together.

I should have taken this picture before the soil was dumped there, but oh well. This shows more of the original border. As you can see, only one of the rhododendron actually grew tall enough to provide any screening. There's another, hidden behind the soil pile, we thought would get taller, but it stayed pretty short. I've also planted two vine maples and three yews behind this border closer to the fence to help block the view.

This photo shows a little better the path that I put in. To the left of the new path, we're also going to create a bed to eliminate some mowing problems (large roots, uneven ground, etc). So I'm tackling this pile second, to give it more time to kill the grass underneath. I'll have to spread it around a bit to cover more. A nameless but decent-looking Japanese maple has been sitting on the deck for several years as a half-trained bonsai. It's going to be planted in this bed, right about where that short shrub is at the tip of the soil pile. That plant is a pieris that was supposed to be 'Mountain Fire' or something involving "fire" in the name. Anyway, it was supposed to get much taller, but somehow took on this compact, ground-covering form instead. The mound it's planted on is an old burn pile littered with junk (our junkyard neighbor is the ex-husband of the woman who sold us this house, so we find some of his junk on our property). We've always assumed there's something horrible in the soil that mutated the pieris into a groundcover, only half-jokingly. Before the pieris, we tried growing a monkey puzzle tree there, and it died. So I hope neither death nor dwarfing occurs when I plant the Japanese maple there. It's a tough one, so hopefully it will be fine. On either side of the path, I'm going to plant Hakonechloa macra 'All Gold', which I have a great mass of already to the right of the path. I also want something dark green, though, so the hakonechloa doesn't become overwhelmingly bright. There's always sword ferns.

The narrow ends of this bed make it a bit hard to mow around and use the new edger on, so a minor expansion is helping take care of those issues and give me more planting space. You can see the expansion in the discolored grass. Yes, I'm a little ashamed to say I used chemicals on some of these areas, including this one. I had been tilling other areas, but found that here where the grass actually grows thickly the tiller struggled and left too many roots and rhizomes to regrow. And in this relatively moist area, especially with the rains returning, tilling would become less effective in killing the grass and many perennial weeds, particularly the creeping buttercup, which can simply re-root from a piece of stem if it doesn't dry out. Since I was already clearing other large areas, I sprayed this area, too. Tilling burns fossil fuels, spraying uses harmful chemicals, and I was preparing too many areas to do by hand. Any method has it's pros and cons. I console myself with the fact that I rarely use chemicals and I'm planting many natives and getting rid of lawn and invasive weeds. It also leaves the soil structure intact, though it does likely fry most of the soil organisms. They'll come back from the surrounding area.

I extended this area a bit, too, to connect the rhododendron on the right and give the many large plants crammed into this bed a little more room. The center of this bed, at least, was cleared by layering compost on top of cardboard. This area stays remarkably green in summer, and gets lots of morning sun with afternoon shade. Good conditions for lush plants with large leaves. This area is going to become my little valley of the giants. I have a Rhododendron rex and sinogrande that are both in locations which are really too dry and lean. Even with supplemental water, they struggle in the dryness of summer. So I'm moving them into this bed, where the soil is rich and stays moist but seems to drain fairly well.

A path curls into this bed to provide access for maintenance, and a larger area at the end will eventually provide a hidden spot to sit and contemplate giant leaves. I'm moving the Rhododendron faithiae in the middle of the curl to the front of this bed and replacing it with the Rhododendron sinogrande. The Rhododendron rex will be near the beginning of the path. Three species of Fargesia are arranged around the future seating area to give it dense screening. The Crinodendron hookerianum that I've kept in a container for the last year is growing much faster than I expected and I've decided to risk planting it at one end of the sitting area, on the right in the big pot. There's a Cunninghamia lanceolata 'Glauca' hidden behind the Crinodendron that will eventually grow up over everything. It will probably do so in 2-3 years, actually, as it's growing very well in this area after being moved from its original location which was too hot and dry. Additional plantings in this area will be simple, mostly dark green ground covers with some silver mixed in, as well as some green and yellow, but relatively little of those. I want it to be lush and peaceful. But of course there will be surprises, too, especially when the two Embothrium coccineum in this bed reach blooming size. This is also where I have my tetrapanax. I had to move them to put the path in. They were not amused. Hopefully they pull out of their wilting sulk and survive winter.

Next to the valley of the giants is the Acer griseum (AG) bed, which I'm planning to plant mostly with low, ground-hugging plants, inspired by subalpine plants in the Cascades but planted mostly with plants from New Zealand and similar places. Putting such small plants next to all those giant-leaved ones gives me a little giggle. The soil becomes drier around the AG bed as you move to the left, or east, and the plants will change accordingly to more drought-tolerant selections.
I'm including this picture mostly for my own reference. I have an azalea in a large blue container that I'm going to plant in the ground. I'm thinking of putting the container on this stump and I'm currently trying to decide what to plant in it, but that's a minor detail that can wait.

This wall on the west side of the AG bed will have plants cascading over it. Right now I'm thinking Leucothoe keiskei. I left a little sliver of room between the path and the base of the wall to put something there, too. I'm thinking Chiastophyllum oppositifolium, possibly some small ferns.

I need to move it closer to the wall, perhaps, but the plan is to have this Edgeworthia chrysantha 'Akebono' growing out over the path so you can look up into the blooms.

Two smaller paths arc out from the main path circling the AG bed. I tried to curve them to where you can't see clearly to the ends of them, but they just aren't long enough for that. I love the Alchemilla mollis I got at the spring plant swap, growing along the bottom of the log on the right. It's already filling in wonderfully.

Looking south toward the AG bed. The smaller bed in the foreground is going to turn back into lawn, and the plants will be redistributed through the area surrounding the AG bed, two Pittosporum tobira 'Tall 'n' Tough', an Olearia macrodonta, and a Grevillea victoriae 'UBC'. The grevillea may go elsewhere. Luckily it's still small enough to move without too much risk. Established grevilleas are not candidates for relocation.

The most recent change was to connect three beds here into one big one around the giant mound of salal. I've been tackling the thistles, non-native blackberries, and other weeds in that mound, too, trying not to harm the salal too much so it fills back in over the weeds and smothers what's left.

A view between the AG bed surrounds and the new bed. There's a bed somewhat visible between them that is also reverting back to lawn, and the plants in it will be redistributed to the larger beds. I want a nice wide entrance into this area. Eventually, there will be cork oak branches arching overhead to form a canopy, though I may never see it in my lifetime. In the background, the mound is still covered in plastic. It's been covered for a few months, in the hopes of baking the Canadian thistle and other tough weeds out of it. Hopefully it's been long enough. The plastic will be coming off soon, possibly this week, as I continue to spread mulch. I need to remember to keep checking on the Arbutus menziesii in the area. I'm trying to collect seeds to direct sow on the mound, and one other place, but I'm not exactly sure when they ripen, other than in fall.

A path now runs along the side of the mound to provide access. I can just picture walking along here, looking up at the branches of the deodar cedar to the left and madrona trunks to the right.

Going back to a spot just north of the AG bed and looking east, you can see the new bed in the upper right corner and part of the big garden on the left. Another wide avenue of grass runs between them. Remember the little bed in the foreground to the right is disappearing. I may pull the edge of the AG bed surrounds out just to the edge of where that little bed is now, just for visual flow. Right now it's so far back from the edge of the new bed that it seems a little disjointed, at least to my eye.

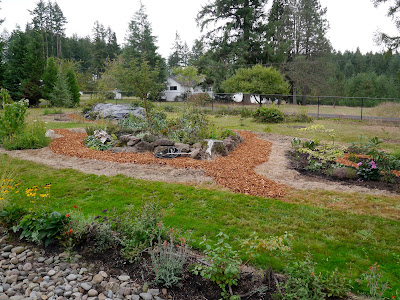
The area that sparked all these projects. I'm coming to think of this as the "hell garden," for multiple reasons. I've repeatedly asked myself what the hell I was thinking as I created these massive garden expansions. I'm glad I'm finally making big, cohesive garden areas instead of little bits here and there, but I've promised myself never to tackle so much at once ever again. Next time I'll work more gradually. This area is also like a giant hellstrip. Shaded in the morning, the sun starts to reach the near edge around ten and by noon the sun blazes over the entire area, baking it for the rest of the day. The soil is remarkably well-drained, but it is an extremely lean clay loam. The Douglas firs on the eastern edge of it suck up all the moisture. Conditions are so harsh that the "lawn," which in our case is really just tough, weedy grasses and an assortment of weeds, has always been patchy here except in the lower right area near the creek bed. Large parts of this area showed more bare soil than plants. Even the dandelions turn brown here. Hellish conditions, to be sure, but a great opportunity for a dry garden.

Panning to the right, standing on the back patio, you can see Cotinus 'Grace' in the more mesic corner of the hell garden, and parts of the other beds out in the yard.

Further right, with 'Grace' on the left for reference, you can see more of the AG bed and its surrounds, as well as the house across the road. As things grow, the view of the road will disappear. I'm also planting a mixed screen along the fence for good measure.

Back to the hell garden, after the first day of mulching. The angle of the photo makes the area that now has mulch look much smaller than it is. In reality, it's probably the single largest area of all, certainly larger than the rest of the areas in the hell garden combined. I should be able to finish mulching the hell garden today, if I get this post finished, get the banana bread baked, and get out there.

It hasn't all been bark chips and mulch. We've been working with blocks, too. This narrow strip off the back patio reduces a curve in the path to hopefully make mowing a little easier. The plan is to have a small kitchen herb garden here, as the patio is right off the dining room and kitchen.

Along the front of the house, the natural rock border has been replaced with more formal wall blocks. I struggled to find a picture that included the old border. I haven't been working on my photo organization project as I meant to do. Apparently I tried to exclude it from photos, a realization that made it easier to let go of the natural stone and embrace the concrete wall blocks that replaced them. This photo is from before I redid the bed last year.

Playing with the panorama function on my phone, I got this extra-long photo. It makes it look like the two beds go back from the steps, but they actually go in towards the steps. I do like the new blocks. We found a concrete block that was made to look more natural, with uneven faces and varying colors, even mixed colors in some of the blocks.

And that's what's been happening in my garden. I hope I didn't bore anyone too much. Bed preparation isn't very exciting, but it means the next step is plants!
Whoops. Blogger seems to have misplaced a couple of my photos. Unfortunately, it seems I have, too. Just imagine a big pile of bark chips, and then a wheelbarrow full of bark chips. Big loss, I know.
 |
| Ten yards of walk-on bark, delivered by Swanson's Bark and Wood Products, our go-to source for bulk landscaping materials. |
 |
| The last load of bark chips. |
 |
| Two trucks, two piles of mulch. They look so small from this angle, with the driveway island hogging center stage. But each of those piles is 20 cubic yards. |
It was after the mulch was delivered that I realized I hadn't done an update for these projects, except for a few status updates on Facebook. So here is a brief tour of the new additions.
This rhododendron border near the western edge of the property was one of the first we planted when we moved to this house. It's main purpose was to help screen off the view of the neighbor's junkyard. Now that he's clear-cut his property, that screen is even more important. The original border ends near the left side of this photo. The rhododendrons to the right of the path are all ones we've moved here this summer to put them in a better, though still too dry, location, and to extend the screen. The original border will extend to connect all of these plants together.

I should have taken this picture before the soil was dumped there, but oh well. This shows more of the original border. As you can see, only one of the rhododendron actually grew tall enough to provide any screening. There's another, hidden behind the soil pile, we thought would get taller, but it stayed pretty short. I've also planted two vine maples and three yews behind this border closer to the fence to help block the view.

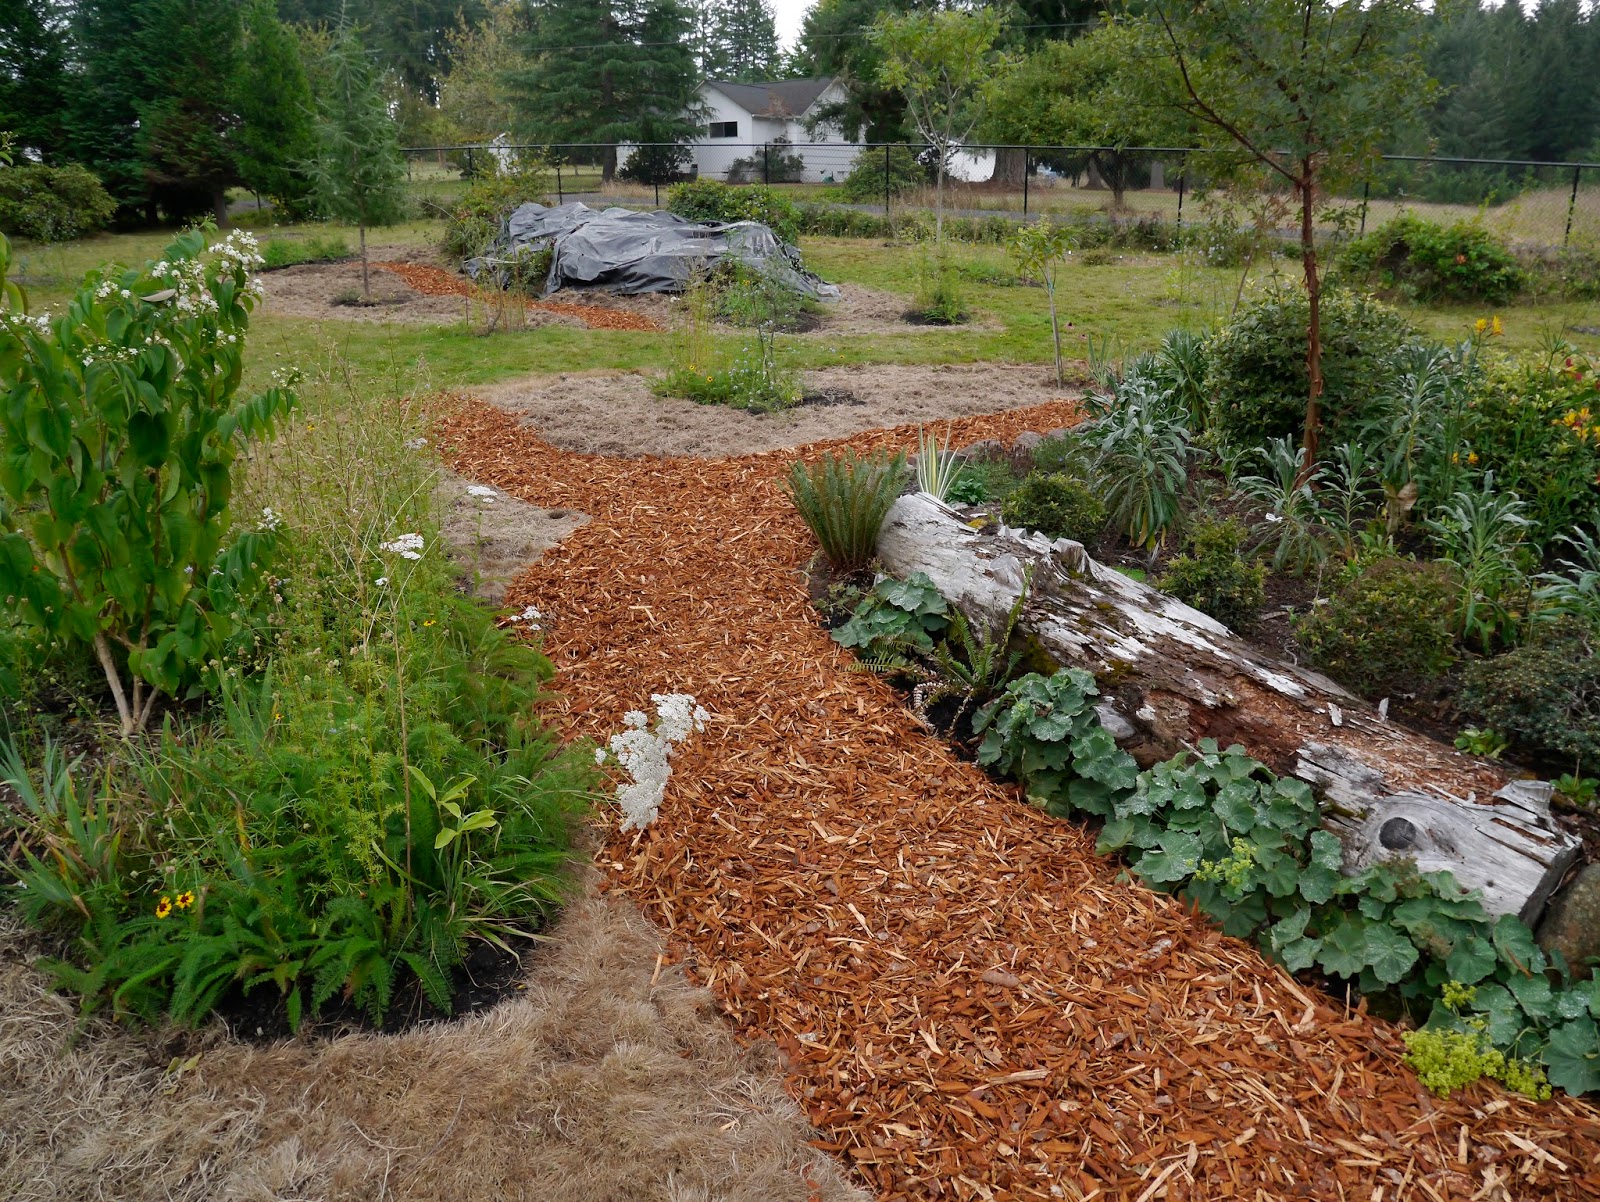
This photo shows a little better the path that I put in. To the left of the new path, we're also going to create a bed to eliminate some mowing problems (large roots, uneven ground, etc). So I'm tackling this pile second, to give it more time to kill the grass underneath. I'll have to spread it around a bit to cover more. A nameless but decent-looking Japanese maple has been sitting on the deck for several years as a half-trained bonsai. It's going to be planted in this bed, right about where that short shrub is at the tip of the soil pile. That plant is a pieris that was supposed to be 'Mountain Fire' or something involving "fire" in the name. Anyway, it was supposed to get much taller, but somehow took on this compact, ground-covering form instead. The mound it's planted on is an old burn pile littered with junk (our junkyard neighbor is the ex-husband of the woman who sold us this house, so we find some of his junk on our property). We've always assumed there's something horrible in the soil that mutated the pieris into a groundcover, only half-jokingly. Before the pieris, we tried growing a monkey puzzle tree there, and it died. So I hope neither death nor dwarfing occurs when I plant the Japanese maple there. It's a tough one, so hopefully it will be fine. On either side of the path, I'm going to plant Hakonechloa macra 'All Gold', which I have a great mass of already to the right of the path. I also want something dark green, though, so the hakonechloa doesn't become overwhelmingly bright. There's always sword ferns.

The narrow ends of this bed make it a bit hard to mow around and use the new edger on, so a minor expansion is helping take care of those issues and give me more planting space. You can see the expansion in the discolored grass. Yes, I'm a little ashamed to say I used chemicals on some of these areas, including this one. I had been tilling other areas, but found that here where the grass actually grows thickly the tiller struggled and left too many roots and rhizomes to regrow. And in this relatively moist area, especially with the rains returning, tilling would become less effective in killing the grass and many perennial weeds, particularly the creeping buttercup, which can simply re-root from a piece of stem if it doesn't dry out. Since I was already clearing other large areas, I sprayed this area, too. Tilling burns fossil fuels, spraying uses harmful chemicals, and I was preparing too many areas to do by hand. Any method has it's pros and cons. I console myself with the fact that I rarely use chemicals and I'm planting many natives and getting rid of lawn and invasive weeds. It also leaves the soil structure intact, though it does likely fry most of the soil organisms. They'll come back from the surrounding area.

I extended this area a bit, too, to connect the rhododendron on the right and give the many large plants crammed into this bed a little more room. The center of this bed, at least, was cleared by layering compost on top of cardboard. This area stays remarkably green in summer, and gets lots of morning sun with afternoon shade. Good conditions for lush plants with large leaves. This area is going to become my little valley of the giants. I have a Rhododendron rex and sinogrande that are both in locations which are really too dry and lean. Even with supplemental water, they struggle in the dryness of summer. So I'm moving them into this bed, where the soil is rich and stays moist but seems to drain fairly well.

A path curls into this bed to provide access for maintenance, and a larger area at the end will eventually provide a hidden spot to sit and contemplate giant leaves. I'm moving the Rhododendron faithiae in the middle of the curl to the front of this bed and replacing it with the Rhododendron sinogrande. The Rhododendron rex will be near the beginning of the path. Three species of Fargesia are arranged around the future seating area to give it dense screening. The Crinodendron hookerianum that I've kept in a container for the last year is growing much faster than I expected and I've decided to risk planting it at one end of the sitting area, on the right in the big pot. There's a Cunninghamia lanceolata 'Glauca' hidden behind the Crinodendron that will eventually grow up over everything. It will probably do so in 2-3 years, actually, as it's growing very well in this area after being moved from its original location which was too hot and dry. Additional plantings in this area will be simple, mostly dark green ground covers with some silver mixed in, as well as some green and yellow, but relatively little of those. I want it to be lush and peaceful. But of course there will be surprises, too, especially when the two Embothrium coccineum in this bed reach blooming size. This is also where I have my tetrapanax. I had to move them to put the path in. They were not amused. Hopefully they pull out of their wilting sulk and survive winter.

Next to the valley of the giants is the Acer griseum (AG) bed, which I'm planning to plant mostly with low, ground-hugging plants, inspired by subalpine plants in the Cascades but planted mostly with plants from New Zealand and similar places. Putting such small plants next to all those giant-leaved ones gives me a little giggle. The soil becomes drier around the AG bed as you move to the left, or east, and the plants will change accordingly to more drought-tolerant selections.

I'm including this picture mostly for my own reference. I have an azalea in a large blue container that I'm going to plant in the ground. I'm thinking of putting the container on this stump and I'm currently trying to decide what to plant in it, but that's a minor detail that can wait.

This wall on the west side of the AG bed will have plants cascading over it. Right now I'm thinking Leucothoe keiskei. I left a little sliver of room between the path and the base of the wall to put something there, too. I'm thinking Chiastophyllum oppositifolium, possibly some small ferns.

I need to move it closer to the wall, perhaps, but the plan is to have this Edgeworthia chrysantha 'Akebono' growing out over the path so you can look up into the blooms.

Two smaller paths arc out from the main path circling the AG bed. I tried to curve them to where you can't see clearly to the ends of them, but they just aren't long enough for that. I love the Alchemilla mollis I got at the spring plant swap, growing along the bottom of the log on the right. It's already filling in wonderfully.
Looking south toward the AG bed. The smaller bed in the foreground is going to turn back into lawn, and the plants will be redistributed through the area surrounding the AG bed, two Pittosporum tobira 'Tall 'n' Tough', an Olearia macrodonta, and a Grevillea victoriae 'UBC'. The grevillea may go elsewhere. Luckily it's still small enough to move without too much risk. Established grevilleas are not candidates for relocation.

The most recent change was to connect three beds here into one big one around the giant mound of salal. I've been tackling the thistles, non-native blackberries, and other weeds in that mound, too, trying not to harm the salal too much so it fills back in over the weeds and smothers what's left.

A view between the AG bed surrounds and the new bed. There's a bed somewhat visible between them that is also reverting back to lawn, and the plants in it will be redistributed to the larger beds. I want a nice wide entrance into this area. Eventually, there will be cork oak branches arching overhead to form a canopy, though I may never see it in my lifetime. In the background, the mound is still covered in plastic. It's been covered for a few months, in the hopes of baking the Canadian thistle and other tough weeds out of it. Hopefully it's been long enough. The plastic will be coming off soon, possibly this week, as I continue to spread mulch. I need to remember to keep checking on the Arbutus menziesii in the area. I'm trying to collect seeds to direct sow on the mound, and one other place, but I'm not exactly sure when they ripen, other than in fall.


Going back to a spot just north of the AG bed and looking east, you can see the new bed in the upper right corner and part of the big garden on the left. Another wide avenue of grass runs between them. Remember the little bed in the foreground to the right is disappearing. I may pull the edge of the AG bed surrounds out just to the edge of where that little bed is now, just for visual flow. Right now it's so far back from the edge of the new bed that it seems a little disjointed, at least to my eye.

The area that sparked all these projects. I'm coming to think of this as the "hell garden," for multiple reasons. I've repeatedly asked myself what the hell I was thinking as I created these massive garden expansions. I'm glad I'm finally making big, cohesive garden areas instead of little bits here and there, but I've promised myself never to tackle so much at once ever again. Next time I'll work more gradually. This area is also like a giant hellstrip. Shaded in the morning, the sun starts to reach the near edge around ten and by noon the sun blazes over the entire area, baking it for the rest of the day. The soil is remarkably well-drained, but it is an extremely lean clay loam. The Douglas firs on the eastern edge of it suck up all the moisture. Conditions are so harsh that the "lawn," which in our case is really just tough, weedy grasses and an assortment of weeds, has always been patchy here except in the lower right area near the creek bed. Large parts of this area showed more bare soil than plants. Even the dandelions turn brown here. Hellish conditions, to be sure, but a great opportunity for a dry garden.

Panning to the right, standing on the back patio, you can see Cotinus 'Grace' in the more mesic corner of the hell garden, and parts of the other beds out in the yard.

Further right, with 'Grace' on the left for reference, you can see more of the AG bed and its surrounds, as well as the house across the road. As things grow, the view of the road will disappear. I'm also planting a mixed screen along the fence for good measure.

Back to the hell garden, after the first day of mulching. The angle of the photo makes the area that now has mulch look much smaller than it is. In reality, it's probably the single largest area of all, certainly larger than the rest of the areas in the hell garden combined. I should be able to finish mulching the hell garden today, if I get this post finished, get the banana bread baked, and get out there.

It hasn't all been bark chips and mulch. We've been working with blocks, too. This narrow strip off the back patio reduces a curve in the path to hopefully make mowing a little easier. The plan is to have a small kitchen herb garden here, as the patio is right off the dining room and kitchen.
Along the front of the house, the natural rock border has been replaced with more formal wall blocks. I struggled to find a picture that included the old border. I haven't been working on my photo organization project as I meant to do. Apparently I tried to exclude it from photos, a realization that made it easier to let go of the natural stone and embrace the concrete wall blocks that replaced them. This photo is from before I redid the bed last year.

Playing with the panorama function on my phone, I got this extra-long photo. It makes it look like the two beds go back from the steps, but they actually go in towards the steps. I do like the new blocks. We found a concrete block that was made to look more natural, with uneven faces and varying colors, even mixed colors in some of the blocks.

And that's what's been happening in my garden. I hope I didn't bore anyone too much. Bed preparation isn't very exciting, but it means the next step is plants!

You're working on a scale that vastly exceeds any work I've ever done, Evan. I might be able to spread 10 yards of bark (although not in 3 days!) but 40 yards of mulch would utterly overwhelm me (and possibly lead my husband to file for divorce). And that doesn't even touch on the effort that I know has gone into preparing all the new beds, much less planting them. You're completely transforming the property - I expect it'll be park-like by the time you're done. Congratulations on what you've accomplished thus far and best wishes with the next steps! Pace yourself!
ReplyDeleteI'm a little overwhelmed, myself. Luckily, I don't have a spouse to divorce me, though my parents may have come close to disowning me when I told them how much mulch we'd need. Park-like is the vision, though it will be 10-20 years before the trees grow enough to give it a really park-like feel.
DeleteOh, and I do plan on taking a break this Thursday to visit some nurseries!
DeleteThis looks like the work of a crew of dozens. When do you sleep?
ReplyDeleteSleep? What is this?
DeleteThis is such a fun progress report. You may not be taking on another huge project ever again, but all the work that you put in thus far is finally coming together. With the paths laid out I can totally envision it. I'm happy to know that ease of mowing is a determining factor in your garden too... I'm looking forward to a 2nd update when the black mulch in place is in place. As always, I can count on you for a new plant: I'm intrigued by Chiastophyllum oppositifolium. The requirement for Neutral or Alkaline soil will provide a challenge but I'll give it a try, if I can find it.
ReplyDeleteOh, I still want a big garden of my own someday, and there will be some big projects in that, but I'm going to try not to take on so much at one time again. One of these big areas I'm working on would have been enough for one year, not five. Yes, ease of maintenance in all aspects is a big factor in this garden, as it's ultimately for my parents to enjoy in their retirement. I've seen Chiastophyllum doing wonderfully in a woodland garden with rhododendrons, which need acid soil, so I don't think the Chiastophyllum is too picky. I think Far Reaches has it.
DeleteI started reading this last night on my old iPad and found that third image, of the two piles of mulch, so confusing I had to stop. Now looking at it on my laptop I can actually see both piles and understand that what I thought was a pile of mulch is the maple in the center of the driveway island. I kept wondering why in the world you would put much in the middle of that island, especially when it looks so good! Duh.
ReplyDeleteAnyway...wow. You've been busy (to say the least). Hope you're enjoying the process at least a little. Oh and for some reason you had me laughing out loud at "Established grevilleas are not candidates for relocation"...it seemed like such a governmental statement.
Ha! I can see how you were confused. That poor maple has become a horrendous haystack. It's overdue for some thinning and shaping. The piles were dumped so far apart that was the best angle to get both of them in the picture. I am enjoying the process. I love getting things done, especially when there's so much visual progress.
DeleteHaha! Oh yes, I'm going to write a whole bureaucratic white paper on rules and regulations for moving plants.