Driveway Island, initial redo
This time, I'll cover the original redesign. One of the parts I'm enjoying most about looking through these old photos is the glimpses they show of the rest of the yard. In the background of this photo, you can see the first rhododendron border. The rhododendrons have grown so much since then, and they've been joined by quite a few more plants. Some of these old pictures also cause less pleasant reminiscences. Behind the daffodils on the left side of this picture, sits the remnant of a Japanese umbrella pine (Sciadopitys verticillata) which had been over 8 feet tall, maybe closer to 12, though my memory has become rather fuzzy. Around Christmas one year, someone came onto our property and cut it down. It might be assumed they intended to steal it for a Christmas tree, but they left it lying there. Perhaps the odd skunky odor of the severed wood put them off. Perhaps it was one of the local young delinquents who simply wanted to destroy things because their tiny brains couldn't come up with something constructive to do (We also frequently found signposts in the nearby park ripped out and tossed into the brush). We left the stump for awhile, hoping a new leader might emerge from the branches left at the base. Really, it could have survived and grown that way, but it never would have regained that perfect, conical form of a well-grown umbrella pine.

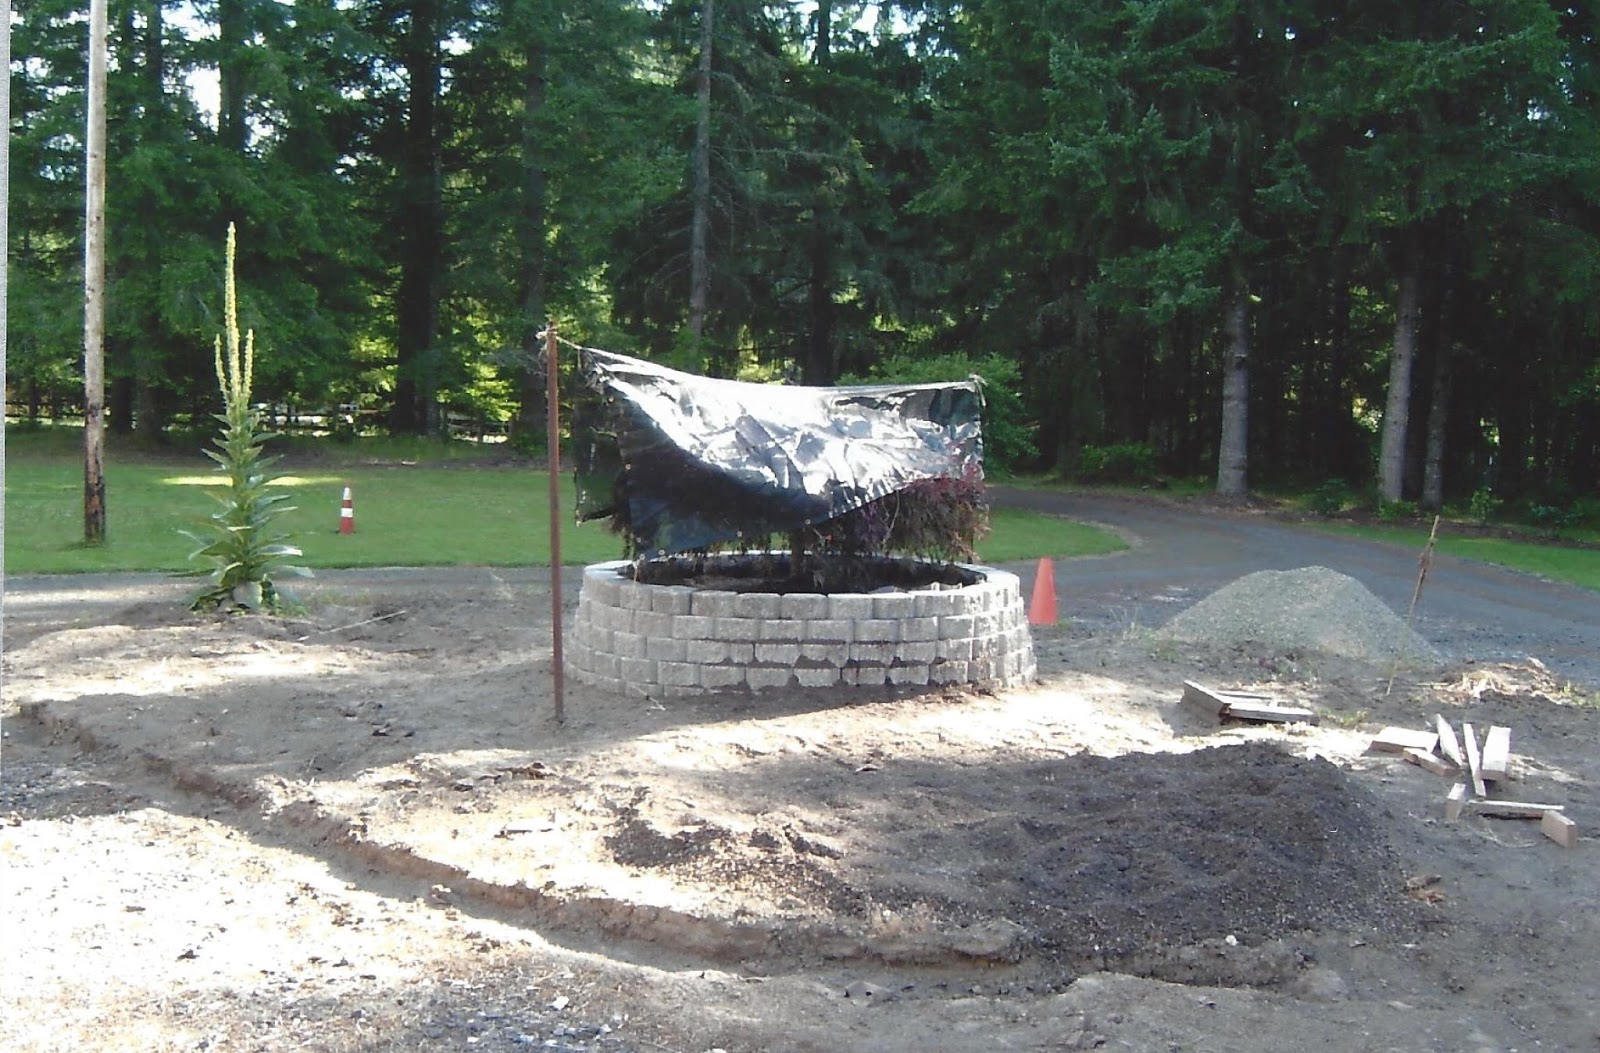
Moving on. The daffodils against the house in the background of this photo were inherited with the house. They were basically all lost in the remodel of the front entry and living room wall a couple years ago. Oh well, they were just the basic yellow trumpet daffodils. I have been meaning to get some new daffodils, maybe some fragrant types in whites, pale yellows, dark yellows, anything but that true yellow I generally find so harsh. But in the times I've been home, I haven't really been focusing on adding bulbs. This photo shows the beginning of the removal process. Here, a red rhododendron and the ginkgo were removed. The tarp was used to drag the rhododendron out.

Apparently I wasn't big on photographing the rest of the removal process. Given that it mostly involved wrestling with the three big junipers at one end of the bed, can you blame me? So here we've fast-forwarded to a cleared bed with the central planter built and the Japanese maple placed in it with a shade cloth over it to help protect it from the summer sun, after severing the big roots that had sunk into the ground from the bottom of its container. Note the giant weed in the background on the left side. The common mullein was so impressive I left it as long as I could.
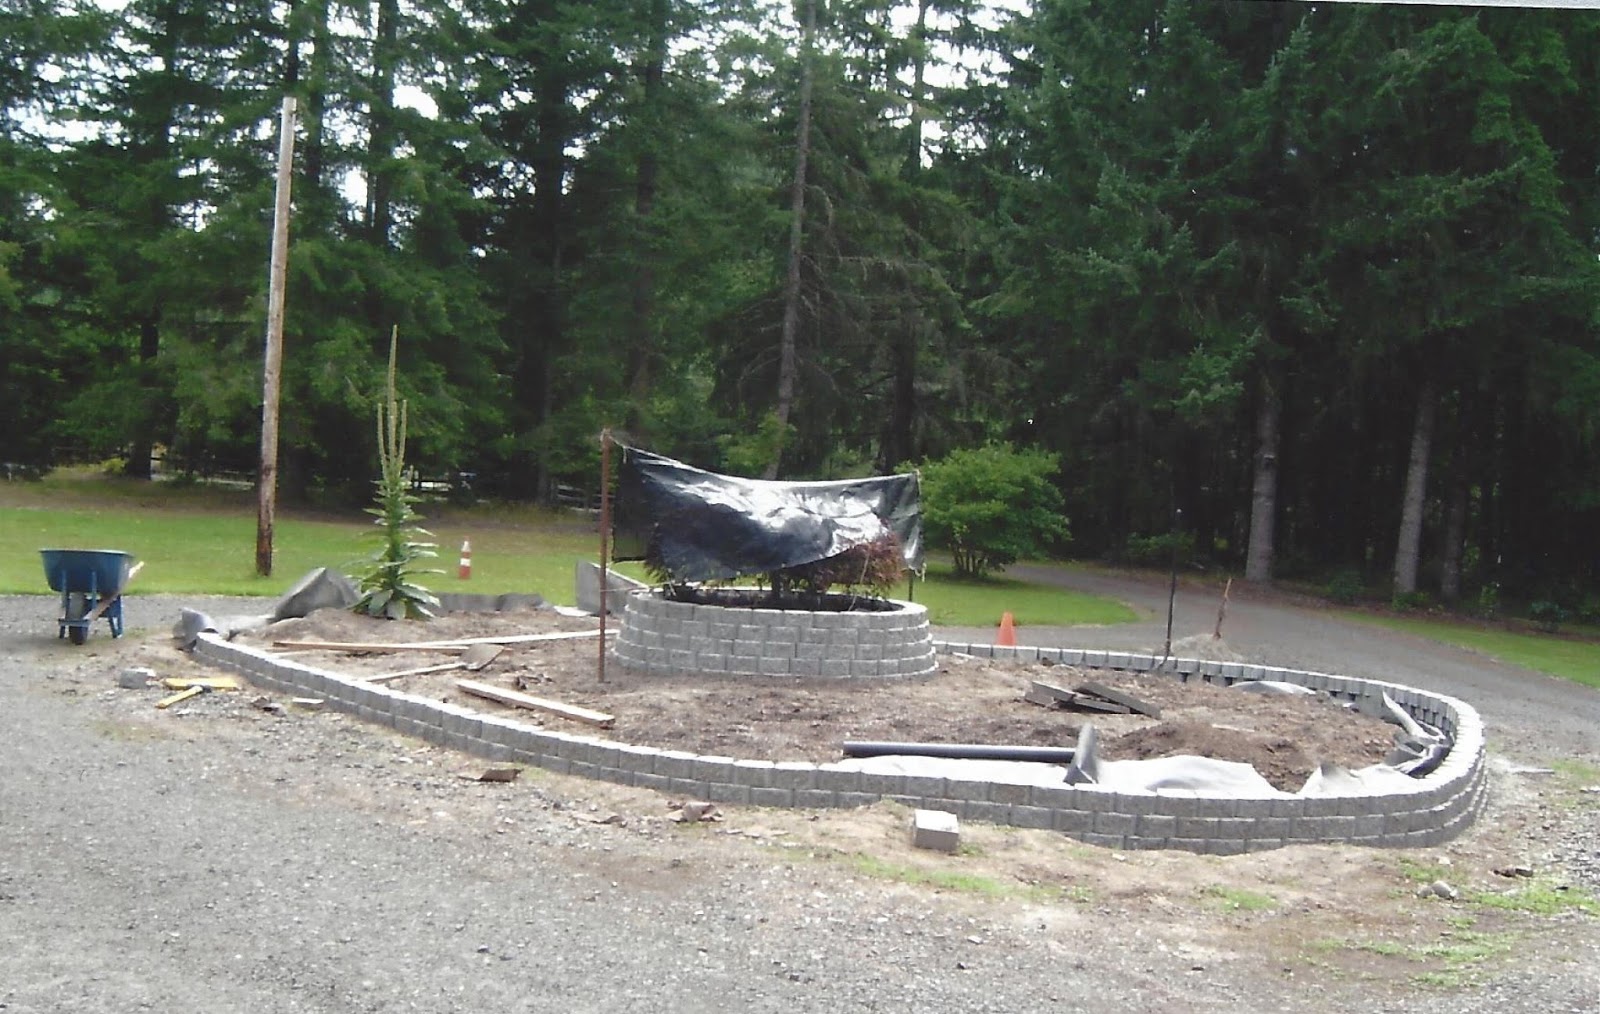
We really discovered just how much the driveway slopes when we were leveling things for the outer wall. This picture was just the start. That cut got a lot taller.

Why stack things neatly when you can just chuck the blocks off the truck. As long as you don't hit another block and break them. We pretended it was a ruin garden, post earthquake.

I think it was about this point that I started getting more nervous about my design choices. The outer wall on this side turned out to need four courses of blocks, and with the tall central planter, it was looking rather imposing, like some sort of citadel. I've always preferred natural stone, so I really wasn't sure about these concrete blocks. In the background, you can see one of the many incarnations of the bed along the front of the house. At this point, we still had yellow gladiolus, though I think the deer had begun to eat the blooms. The arborvitae and rhododendron were still there on the right side. The former was removed sometime later, the latter was relocated to an area where we could let it grow as big as it wanted.

The completed wall.
Looking back, it's silly, but we lined the walls with landscaping fabric so soil wouldn't leak out. Really, the blocks fit tightly enough that it wouldn't really be a problem. I wish we hadn't done it so soil could work its way into the blocks and thus allow plants to grow out of the wall.

The giant weed is finally gone, because it was time to place plants. I rarely have all the plants for a bed so I can place them all before planting. I think most home gardeners are probably the same. It's far more common to get a few plants at a time and try to figure out their ideal placement now, trying to keep future additions in mind.

It's much easier to see the mini creek beds in these photos, because the plants haven't filled in around them. Look how small that 'Crimson Pygmy' barberry is at front and center! Little did I know they'd grow half again as large, or more, as the label said and become too large for the space.

The dry creek bed on the south end of the bed.

And the one facing the house.

Starting planting. This was in summer, so we had to water a lot. There was still some crispiness, but overall everything came through. In the background, you can see Stump St. Helens pre-planting, and a slash pile left over from the logging. That one stuck around for a long time.

Planting continues. In the background, you can see another rhododendron on the southern end of the house, and some of the stumps left over from logging. But, this was obviously long enough after logging that the grass has filled in those areas. What a waste, all that open ground allowed to turn into weedy lawn. Those poor rhododendrons, including two more out of view on the southern end of the house, were growing in so much shade they were leggy and barely bloomed. Post-logging, they started growing and blooming much more vigorously, but it was clear they needed to be moved because of their size and cultural needs.

As plants went in the ground, the stacks of pots grew.

And the plants are all in!

The shade comes off the maple. Look at those beautiful red phormiums. Obviously, this was pre-Phormium Killing Winters. Here, you can also see the Carex comans 'Amazon Mist' planted in the dry creek beds. The plan was for them to grow along the creek beds and look like flowing water. It sort of worked, for a while. Those original plants are long dead, but their offspring continue to perpetuate themselves through seedlings.

Things look so new and raw in these photos. (Maybe because they are?) The plants have yet to fill in and mingle, taking on their own life beyond the original design. The walls haven't taken on any mossy patina.

More carex in the creek bed. This bed was actually large enough that it might have contained the carex as they grew, but an unexpected problem arose. The deer trampling through this bed kept causing the gravel in the creek beds to slide down to expose the landscape fabric underneath and bury the sedges.

So many of the plants in this photo have been removed or died. Phormium: dead. Crocosmia 'Lucifer': relocated. Rhododendron impeditum: dead or relocated. Stachys byzantina: removed. Hebe 'Red Edge': eaten by deer, finished off by the PKWs. Bergenia: one left that survived the deer by hiding under a heather. 'Crimson Pygmy' barberries: relocated this summer, mostly dead. Stipa gigantea and Carex comans: originals died, but left seedlings that live on. Iberis sempervirens: eaten by deer and removed. Bearded iris: removed, still trying to figure out where to put them. Many of the heathers were removed this summer, most of them are basically dead because of those surprise early heat waves and lack of rain in spring/early summer. I had a ton of red Sedum spurium, both 'Dragons Blood' and another variety. Almost all of that was demolished by the deer over the next several summers. I've said it many times, sedums are not deer-resistant. At least not in my garden. I have a feeling it would be the same in other summer-dry gardens with sufficient numbers of deer. By the middle of the dry season, deer are looking for anything with moisture in it. A few stray bits of that sedum have survived. Now that the deer fence is up, they should start making a comeback.

I knew there was a substantial seed bank in the soil of this bed, so to reduce the number of weeds, we sheet mulched with newspaper and compost. There were, of course, jokes that we should leave it this way.

But of course, the newspaper would have blown away, so we had to cover it.

All pretty with fresh compost setting off the plants and the grey creek beds and walls.

The other side.

And another angle.


I very rarely bother with garden art, but I included this solar-powered pagoda light to accentuate the slight Japanese feel of the bed. Ugh.

Finally, a picture from the fall after planting. The Asarum caudatum under the maple consisted of only a few small plants, a long way from the lush carpet it became. I do love the silver sedge with the red leaves. Maybe I should plant some seedlings back up in the central planter again.


I have to admit it took me awhile to get over the Sciadopitys verticillata destruction and read on, but thankfully I did. Wow, what a lot of work. It can be a little unnerving to look back at your earlier designs (sometimes I wince and want to hit delete when I read my early blog posts) but surely you must feel good about what you created here. Did a lot of your inspiration come flooding back as you looked at the photos? One last question. Why no action shots of a younger Evan planting? Surely your mom must have taken at least one photo?
ReplyDeleteIt took me a little bit to continue writing this post after thinking about that Sciadopitys. It still upsets me. I'd say I'm about equally proud and embarrassed by this original makeover. There are things I like and things I cringe at. The plants have changed so much. Mostly, I'm glad those raw cement blocks have aged and gotten some moss in places, and the plants have spilled over here and there. My tastes, priorities, and approach to gardening and design have changed so much since then, it's hard to recapture the same "inspiration," but I think I've only improved since then. Ha, sorry. I do have pictures of me "working" in the binder, but I hate pictures of myself, so I'm not posting them.
DeleteI like your meandering dry stream beds, Evan, it's intriguing trying to imagine the bed with the plants filling in. I'm sorry to hear about the vandalism, even more disturbing being human, I get resigned to plants being damaged by deer. I envy your deer fence, maybe someday I can live without them. Having a nice level bed to play around with sounds like lots of fun! I'm getting more interested in Carex and trying to grow some from seed this year, they are stratifying now.
ReplyDeleteThanks, Hannah. I wish I had more intermediate pictures of the bed as it filled in. I'll have to jump straight to the patchy and overgrown stage it reached before the latest redo...Soon as I dig up those pictures. If only I were organized. Hope we'll get to read about your Carex experiments.
DeleteIt's fun to look back at the creation of this bed that now looks like like it's been there forever. Interesting the plants we've loved and lost either on purpose or otherwise.
ReplyDeleteI remember thinking it would take forever to get that mature "been there forever" look. It's amazing how fast it actually occurred. Gardens are always changing.
DeleteIt's impressive to see all the work the went into this area from its inception, Evan. The learning process is always a bit painful, isn't it? I'm sure the deer fence is going to make a huge difference for the future of this area. As to the vagaries of the weather, we're all learning how to adapt to the changes imposed by global warming.
ReplyDeleteThe deer fence is a complete game changer for the entire garden, and the areas of the woods that are enclosed in it as well. I'm looking forward to watching things grow and planting new things without having to worry about deer.
Delete